Table of Contents
How to partition a hard drive might seem like a daunting task, but it’s easier than you think. Do you ever feel like your computer’s hard drive is a cluttered mess, making it nearly impossible to find the files you need? Or perhaps you’ve been searching for a way to keep your system files and personal data separate for better organization and security. The solution is simple: partitioning your hard drive. Not only does it provide a streamlined way to manage your data, but it also enhances system performance and simplifies backups.
In this guide, you’ll learn everything you need to know about how to partition a hard drive on Windows 10 and Windows 11. Whether you’re a tech novice or a seasoned user, this step-by-step walkthrough will ensure a smooth and stress-free experience.
What Does Partitioning a Hard Drive Mean?
Partitioning a hard drive is the process of dividing it into separate sections, or partitions, that function as independent drives. Each partition can store data, run programs, or even host its own operating system. Think of it as dividing a physical filing cabinet into drawers, each designated for a specific purpose.
Benefits of Partitioning
- Improved Organization: Store your system files, work documents, and personal media in separate partitions for easy access.
- Simplified Backups: Back up only the partitions containing critical data instead of the entire drive.
- Enhanced Performance: Allocate space more efficiently to ensure your system operates smoothly.
- Dual Booting: Install multiple operating systems without interfering with each other.
Common Scenarios for Partitioning
- Setting up a dual-boot system with different operating systems.
- Keeping your personal files separate from system files for added security.
- Allocating a specific section of your drive for gaming or video editing.
Preparing to Partition Your Hard Drive
Before you dive into the process, it’s essential to prepare your system. This ensures the process is safe and efficient.
Important Precautions
- Back Up Your Data: Partitioning involves manipulating your drive, which carries a small risk of data loss. Use external drives or cloud storage to secure your files.
- Check Free Space: Ensure your drive has enough unallocated space to create a new partition.
Tools You’ll Need
Windows comes with a built-in tool called Disk Management, which is perfect for basic partitioning tasks. If you’re looking for advanced features, consider third-party software like EaseUS Partition Master or MiniTool Partition Wizard.
Checking Your Current Hard Drive Setup
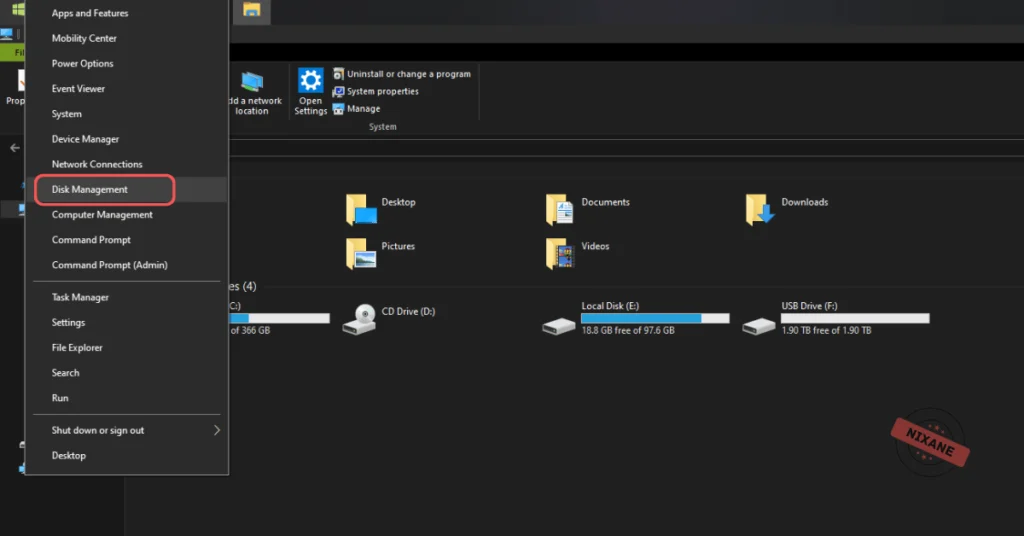
- Right-click the Start button and select Disk Management.
- Review your drive’s layout, including existing partitions and unallocated space.
- Note the available free space for partitioning.
How to Partition Your Hard Drive in Windows 10/11
Now that you’re prepared, let’s dive into the partitioning process.
Using Windows Disk Management Tool
Follow these steps to partition your drive using the built-in Disk Management tool:
1.Access Disk Management
- Right-click the Start menu and choose Disk Management.
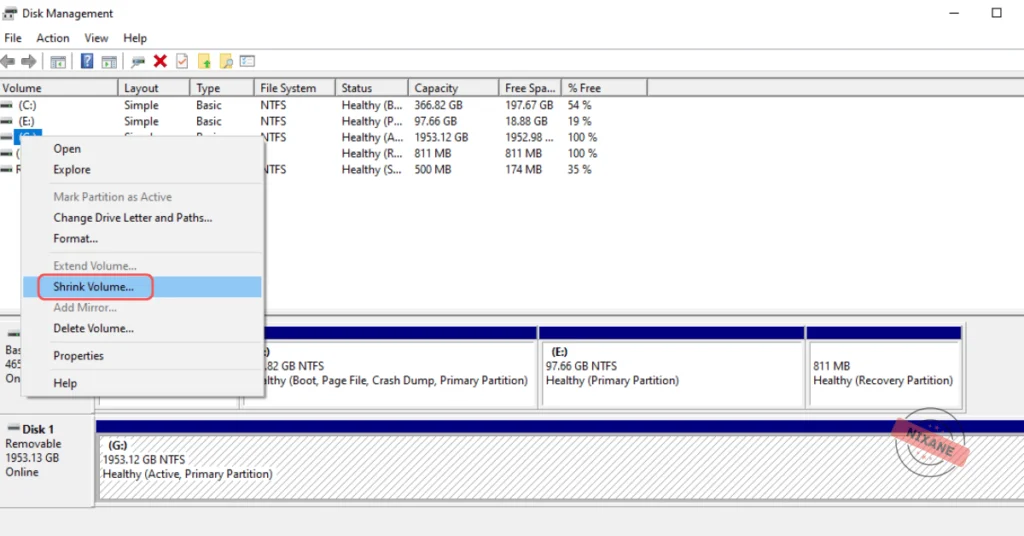
2.Shrink an Existing Volume
- Right-click the drive you want to partition and select Shrink Volume.
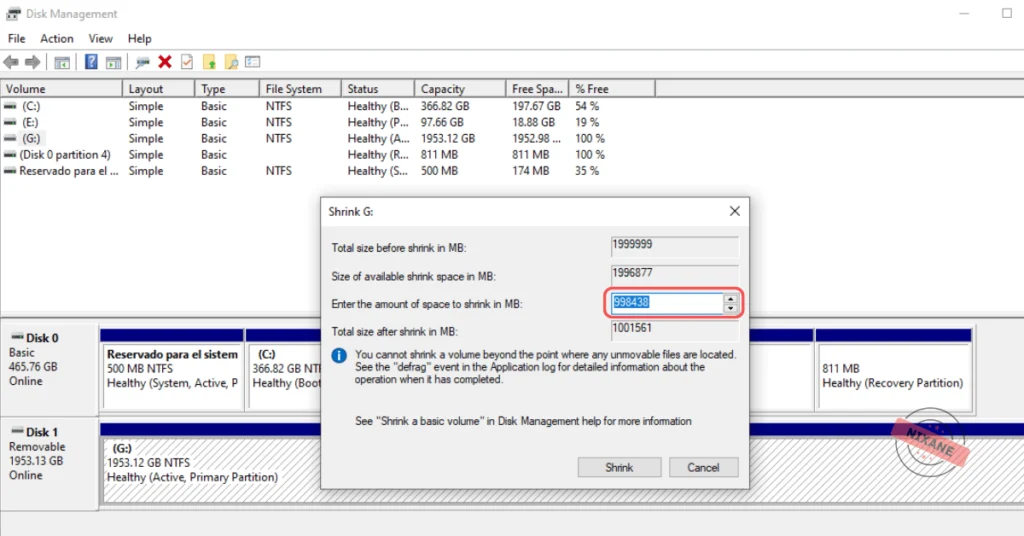
3.Enter the amount of space to shrink (in MB) and click Shrink.
4.Create a New Partition
- Right-click the unallocated space and select New Simple Volume.
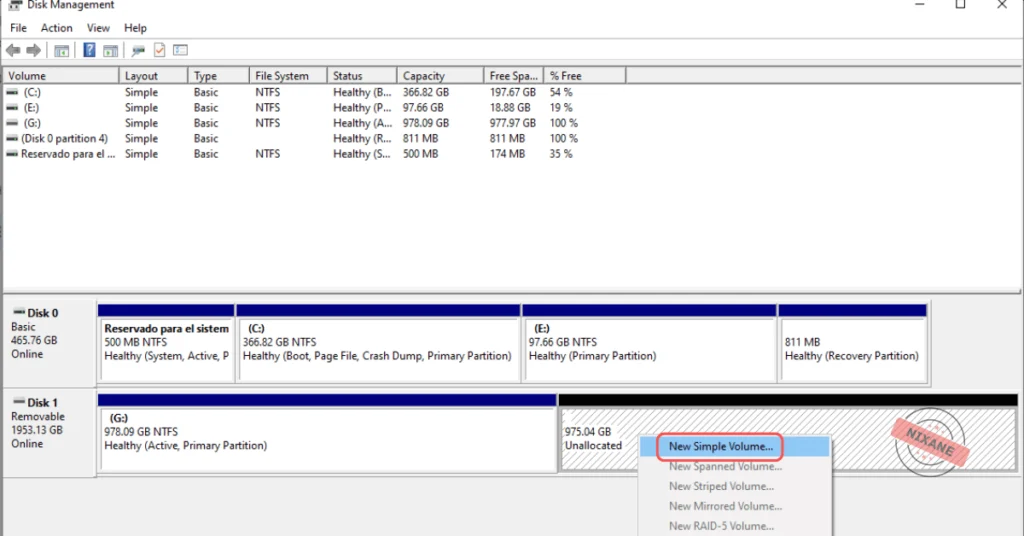
- Follow the wizard to assign a drive letter, format the partition, and give it a label.
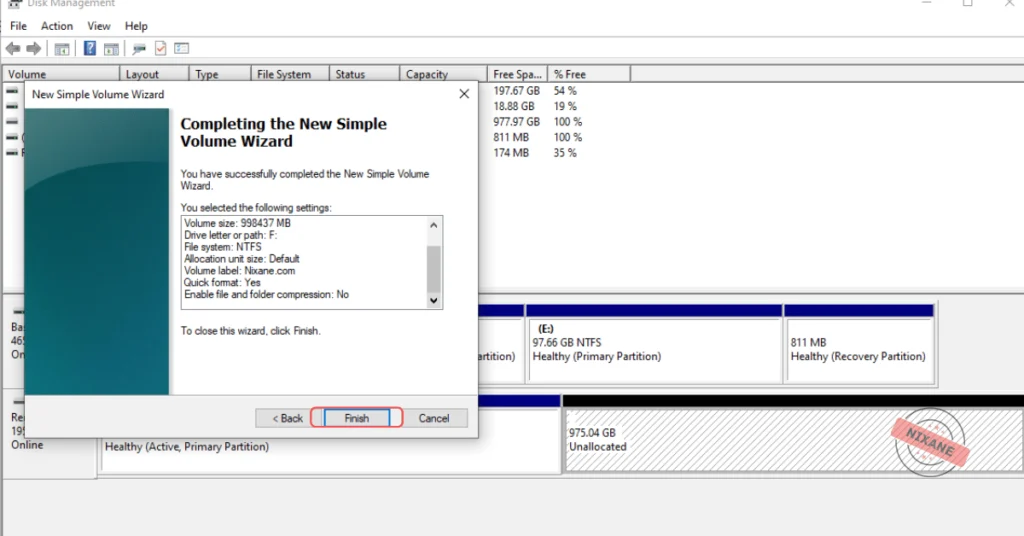
5.Complete the Setup
- Click Finish, and your new partition will appear in File Explorer.
Using Third-Party Software (Optional)
If Disk Management doesn’t meet your needs, third-party tools offer more flexibility:
- EaseUS Partition Master
- Features include merging partitions, resizing without data loss, and advanced formatting options.
- MiniTool Partition Wizard
- Known for its user-friendly interface and robust functionality.
Steps for third-party tools are typically straightforward and come with guided wizards.
Troubleshooting Common Issues
- Insufficient Space: Free up space by deleting unnecessary files or transferring data to an external drive.
- Formatting Errors: Ensure the new partition uses the correct file system (e.g., NTFS or FAT32).
- Partition Not Showing: Assign a drive letter in Disk Management if the new partition doesn’t appear.
Best Practices After Partitioning
Once your partitions are set up, it’s time to make the most of them.
Organizing Your Files
- Use one partition exclusively for your operating system and essential programs.
- Allocate separate partitions for documents, media files, and backups.
- Label each partition clearly to avoid confusion.
Regular Maintenance
- Monitor partition health with tools like chkdsk or third-party utilities.
- Periodically clean up unused files to free up space.
- Adjust partition sizes as needed using Disk Management or third-party tools.
Frequently Asked Questions (FAQs)
Q: Can partitioning improve system performance?
Yes, especially if you separate system files from other data, as this minimizes fragmentation and speeds up access times.
Q: Is partitioning risky for my data?
While the risk is minimal, backing up your data before partitioning is always recommended.
Q: How many partitions should I create?
It depends on your needs. A common setup includes a partition for the operating system, one for personal files, and another for backups.
Q: Can I undo or merge partitions later?
Yes, using Disk Management or third-party tools, you can resize, merge, or delete partitions.
Conclusion: Take Control of Your Storage
Partitioning your hard drive is a powerful way to organize your data, improve performance, and simplify backups. Whether you’re separating system files from personal data or setting up a dual-boot environment, the process is straightforward and well worth the effort.
Ready to get started? Open Disk Management and take the first step toward a more organized digital life. For more advanced needs, explore third-party tools to unlock additional features. Your computer will thank you!
Partitioning doesn’t have to be intimidating. By following this guide, you’ve equipped yourself with the knowledge and tools to manage your storage effectively. Now it’s your turn to put these tips into action and enjoy the benefits of a well-structured hard drive.
